Website 3 (Geolocation)

Sinan Al-Defa'i

As we described in the previous website blogpost I still had to check the user if he is at the right location before answering the question. The first problem i was facing was to how I get the user location. I tried different methodes including the Google API, but in the end there was something even better. It turns out you cant get someone’s location with the HTML 5 Geolocation function. It looked something like this.

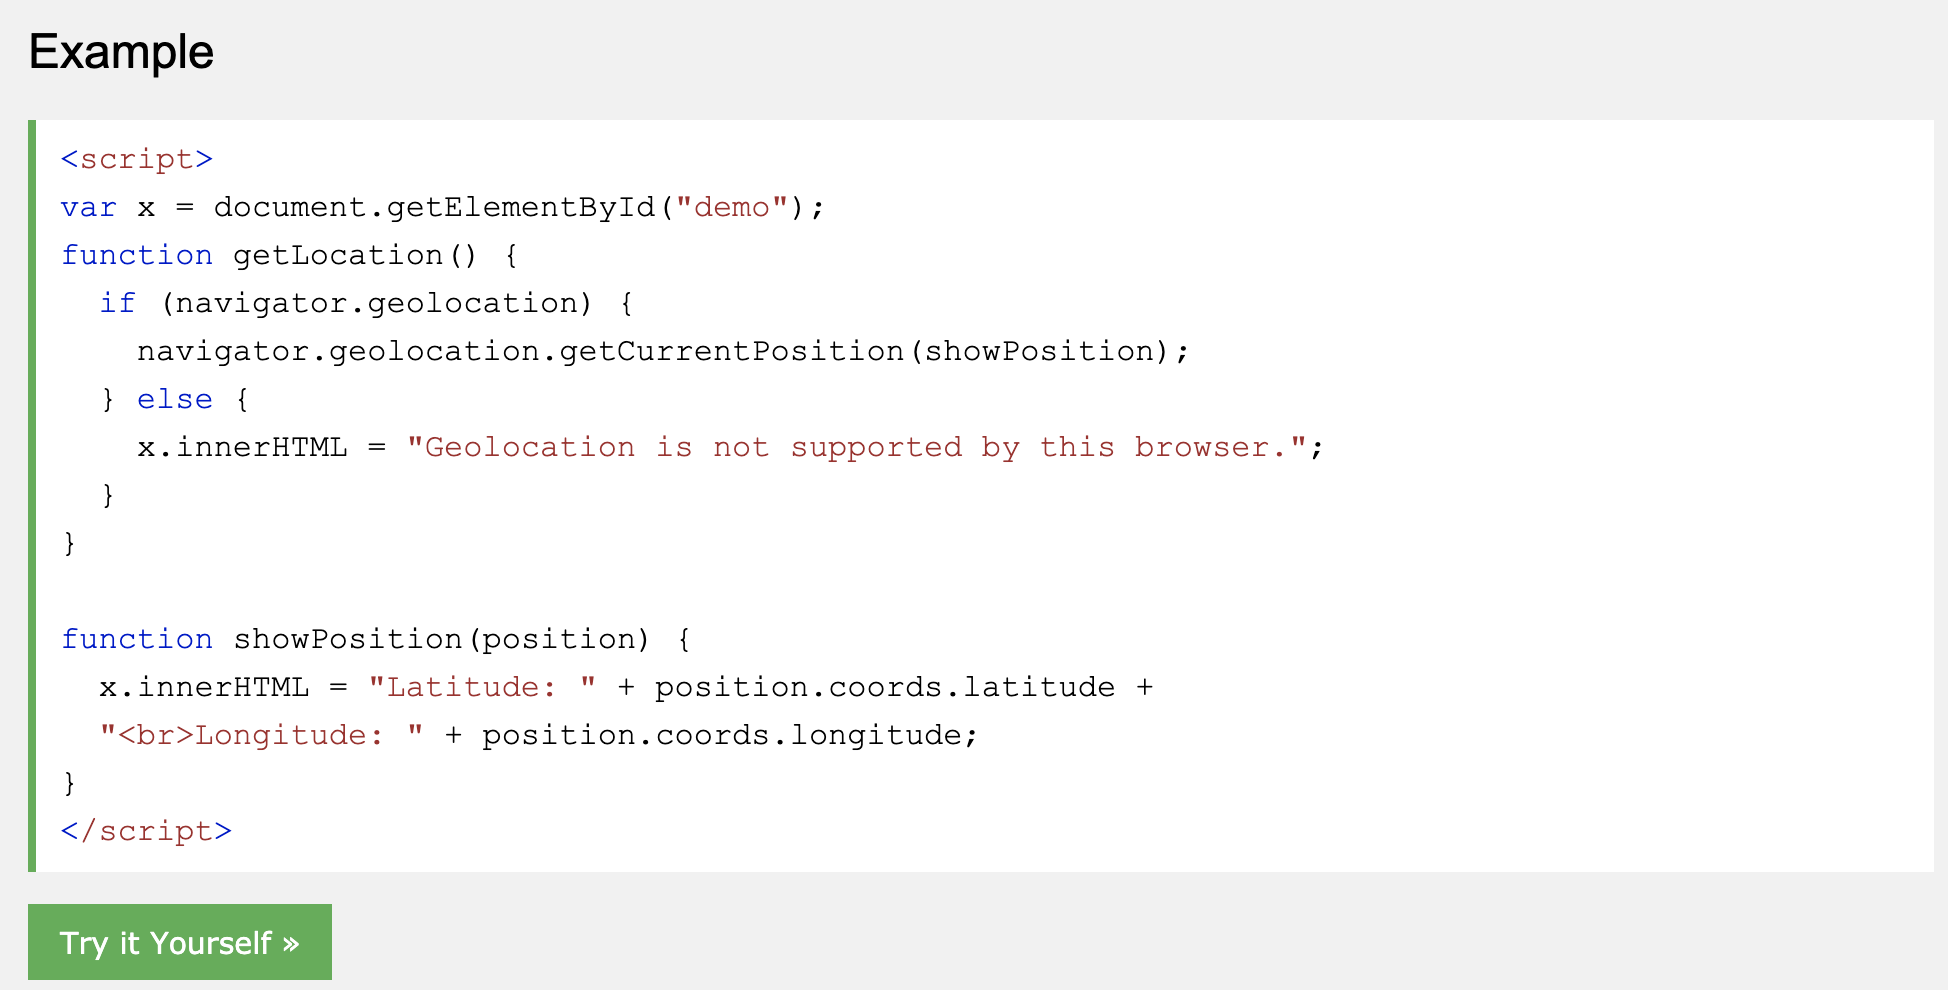
I had to change the showposition function to make add the long and lat to a global variable. This so i could get the long and lat everywhere, and i needed it later on in other functions.
Now that i got the long and lat of the users, i could compare it with the static longitudes and lattitudes. For example, I first had to get the exact location of the church (52.22141047907518, 6.895051449537277). This I could find in google maps. Then the last thing was compare the two. Unfortunately i had to write or find a function which could do that. After some research i found that there is a formula for that called the Haversine formula. I found alot of them and alot of them didn’t work. Until i found one that did work.

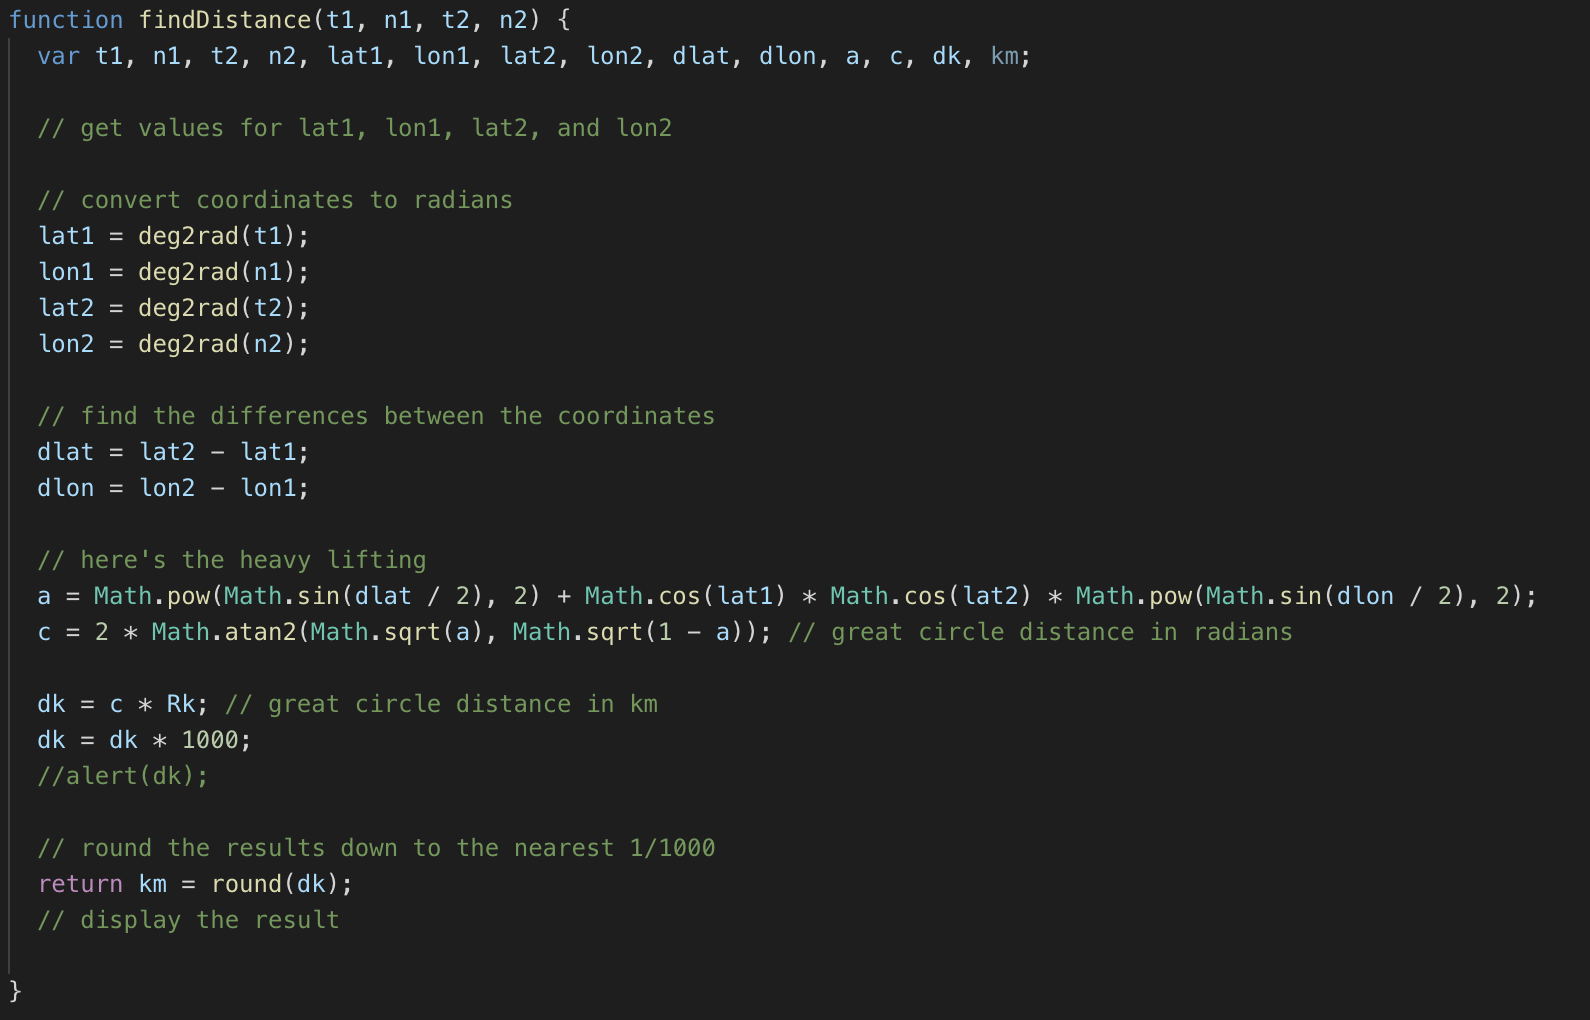
You had to give these 4 parameters to the function and it would return the distance in km. Which i then could multiply by 1000 to get in meters. Now i could just use the function to check if the user is 30 meters in reach of the church for example.

I made a button in every slide to check if the user is in reach.
In the next blog post i will talk about the Timer and saving it in a local storage.

Website 2 (Slider)

Sinan Al-Defa'i

Because of the fact that we wanted to use the idangerous swiper slider like you saw in the previous website blogpost, there were alot of functionalities to program. At this time i didnt know which ones i had to write myself and which one were built in. So the first problem we had was that there were multiple questions. We figured we wanted to do it so that you cant continue with the other questions untill you had answered the previous question correctly. You also shouldn’t be able to answer the question untill you are at the specific location. But i’ll cover that in the next blogpost. First thing i had to do right now is to lock the sliders and only make them unlocked when there is a button pressed. At first i tried to set the “display” of the arrows to “none”. But i soon found out that the default css of the slider overrides that and doesnt let you do that. So i checked the documentation of the slider and checked if there was a function to disable the slider arrows. https://idangero.us/swiper/api/ . After a lot of trying and asking Boris, i figured out how to lock the slider. Now i could move on to the next part. And that was to make the right answer to questions unlock the slider.


After initializing the slider and locking the slides, I made the questions on every slide. Then I made the quiz.

This is one of the functions for the first question. I want to immediately check if the question is answered correctly, so on input click i do $(each) for every answer. If this answer is correctly i’m setting the css “color” to “green”, and if it doesnt match the correct answer it becomes “red” and adds 40 seconds to time. I’ll tell something about the time in one of the next blogposts. Then i want to make the time span go red for a second. After it’s answered correctly it should unlock the slides and then move to the next slide automatically. Luckily there’s also a built in function in the framework.

I want to not swipe immediately, but after 1 second. That’s why I use the function setTimeout. Those are the main functionalities for the slider. In the next blogpost I will cover the use of geolocation.

Reward and Research

Uncategorized

Last post (Getting in contact) Ruben and Dennis reached out to a couple of people that could help us in a very nice way.

Our results are that we have a reward! We have managed to get 4 free tickets that are both usable voor De Museumfabriek and Rijksmuseum Twenthe.

From the message Dennis sent to a group of city tour guides, we managed to get in touch with Frits Heijne, the oldest city guide of Enschede. Next Wednesday (26th) we will take a tour at 13:00 where he will show us pictures and get information that can’t be found on internet, which is a big plus for us

Getting in contact

Uncategorized

To better our entrepreneurial skills we contacted a few different people for a few different reasons.

Ruben contaced:

  • Rijksmuseum Twenthe
  • De Museumfabriek

Dennis is contacting:

  • Diffrent citytour guides

Ruben is trying to arrange a sponsor for a reward. Because of our installation focussing about having an experience in the history of Enschede some good partners for us, we figured, are musea. Ruben sent them an e-mail and is waiting for response.

Dennis is trying to get to know some cool facts about Enschede only certain people know, so that we have special information, not from the internet.

Dennis also asked Enschede Promotion (our client) if they could offer our experience to visitors, unfortunately we were denied. They said: “We can’t do it right now, but if it is a succes, we could implement it on our website”

Building the Installation 3.0 (The pedestal)

Uncategorized

We have some clear roles every teammember has to do for the building:

Rene was mostly busy with testing and lasercutting.
Femke was busy with getting us the supllies
Marco’s focus point was getting the door mechanism to work
Rubens main focus was to make sure every chord was long enough en was working together with Dennis
Dennis main goal was making the newspaper next to our safe
Sinans job was to still work on the website, it has proven to be such a time investment that he can’t really help with building.

Our installation exists of 3 parts, the safe, the pedestal and the stand. With the stand and Safe being (apart from decoration) nearly done. We only have the pedestal to wory about for this week. School provided us with the wood and an installation guide. Dennis and Ruben built the pedestal and both painted it with brown acryl paint. With two layers of paint we got a realy nice texture and color

This is the end result:

Our building is ahead of most groups and we are happy that is coming along quite nicely. Next week we want to have it completely working with functionality and looks, which we think is feasible

Building the Installation 2.0 (The Newspaper)

Uncategorized

We have some clear roles every teammember has to do for the building:

Rene was mostly busy with testing and lasercutting.
Femke was busy with getting us the supllies
Marco’s focus point was getting the door mechanism to work
Rubens main focus was to make sure every chord was long enough en was working together with Dennis
Dennis main goal was making the newspaper next to our safe
Sinans job was to still work on the website, it has proven to be such a time investment that he can’t really help with building.

The newspaper stand went from being 2 wooden logs with one nail to a stable installation where our introduction video will be placed.

The people who worked most on the newspaper stand were Dennis and Ruben. Dennis was the handy man in sawing the wood en screwing is together. Ruben helped and assisted him with holding and painting the stand. Ruben and Dennis also went to Rubens house to spraypaint different decorations for the safe and the installation in general.

We started with this

Dennis brought a pole to school and he cut an angle out of it so that it’s tilted forwards. the next thing we had to do was make a case for our monitor.

We placed the monitor on one of the provide wood pieces that school gave us and we started making measurements about what size the encasing should be. We found that the case should be 56cm in width and 43 cm high. inside that (in the middle) the display would take up 34cm of width and 18 cm of height.

Ruben measured it out and drew it on the MDF wood. Dennis proceeded to saw it to those measurements. When we finished we had the top of our stand done. We made the bottom a little smaller (because we ran out of wood) but it wasn’t noticable. We proceeded to make 4 side pieces with one side piece having room for:

  • Ventilation
  • Cables
  • Our sensors

Now we had the rough idea of the stand itself. We proceeded to paint the stand the same color as the safe (Rock grey) and we decorated the top part with a lasercut piece of wood. It is in the shape of a newspaper and conveys that feeling. Lastly we added support beam for extra stability and we added velcro fastener to the top so that we could, at any moment, open the newspaper and get to our monitor

After 2 days of continuously working on the stand. Ruben and Dennis nearly finisched it apart from decoration. This is the end result

We are very happy with our finished product. It looks clean and doesn’t need a lot of work anymore

Building the installation 1.0 (The door)

Uncategorized

This will be a post which contains the work of Week 6 and 7, We have made a lot op progress. From having only a large box to have a nearly functional safe which has the look, but not quite the feel we want it to have.

We have some clear roles every teammember has to do for the building:

Rene was mostly busy with testing and lasercutting.
Femke was busy with getting us the supllies
Marco’s focus point was getting the door mechanism to work
Rubens main focus was to make sure every chord was long enough en was working together with Dennis
Dennis main goal was making the newspaper next to our safe
Sinans job was to still work on the website, it has proven to be such a time investment that he can’t really help with building.

Everybody did their takst and i’m now taking you through our process.

We started with the box that Marco got from home. We first wanted a mechanism that could turn the doorn by itself and the open. After being on it for a few days, we and Marco realized it wasn’t feasible. It worked but the closing of the doorn was a pain in the butt. We skipped the entire idea of making it turn. Marco’s next thing was making sure the door could open and close with a mechanism. He cut out the cirkel for the door, got the hinges and secured the door. He had some minor setbacks with the wood being to soft and breaking or not being able to hold the door. After a few days and multiple attempts the door was functional and the safe was painted “Rock grey”. The finished result is shown below

What is show here is also the work of Rene. Rene designed the buttons and the dials so that you could enter a combination. Ruben painted those buttons with ‘beits’ to give it a bronze wooden look. We will probably repaint our installation and make it more clean. But the door is finished.

We will later add the functionality before meeting with Harry and Boris so that they get the idea of how it works

We also added the Potmeters which Ruben made longer to about 2 meters, so that they could reach our laptop in the stand

Here are shown: the wires of the potmeters and de lock mechanism. The lock is a servo that will open on the right combination and close on the wrong. It is a easy and nifty little solution for our lock. We chose to make it ourselfs instead of buying a pre made one because we could customize it better this way

Character Design 3.0

Uncategorized

We decided to change the appearance of our character design again. We want convey a more ‘sneaky’ look with our character. We will choose the color scheme based on our stylesheet as so for the typography . We will create a side and a front view of the same character.

The end-result is shown below

We removed most of the details of the person on the left. Giving them more the same appearance, also trying to blend the 2 styles more together